
Table of Contents
Let’s walk through making a very simple message wall application. This application gets two pieces of information from the user (their name and a short message), and sends that information to the server. Any client who visits the message wall page can see all of the messages left by all of the other users. It’s like a little guestbook!
Getting Oriented
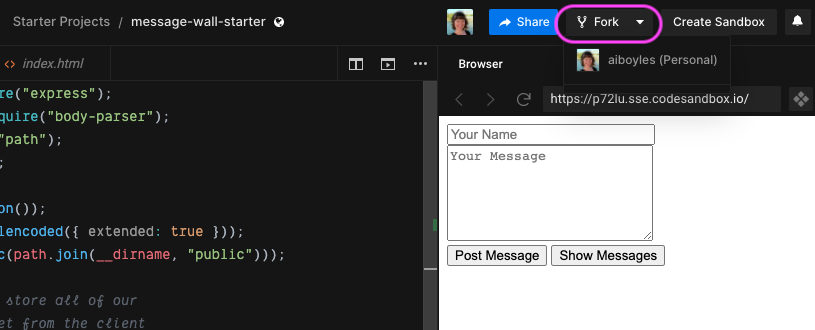
Step 1: Fork the message-wall-starter project.
Begin by forking the message-wall-starter project on CodeSandbox.
Step 2: Let’s look at the file tree for this project.
Let’s begin by seeing what files we have to start with, and how they fit together.
In the public folder, you’ll see an index.html file, a script.js file, and a style.css file. These are the HTML, JavaScript, and CSS files that make up the client-facing website that any user to this application will see. It’s just like the websites you’re used to making!
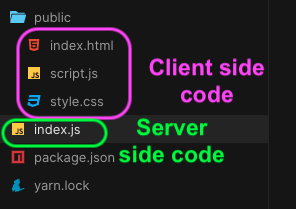
Outside of the public folder, you’ll see a file called index.js. This file contains your server side code. The visitors to your website won’t see this!
You’ll also see a couple of additional files named package.json and yarn.lock. Don’t touch these! We won’t get into these too much, but these are automatically generated files that manage things like packages and dependencies for the project.
Step 3: Let’s look at the HTML file for this project.
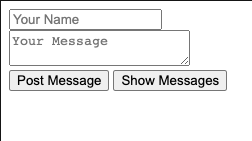
<div>
  <input type="text" id="name" placeholder="Your Name"></br>
  <textarea id="message" placeholder="Your Message"></textarea></br>
  <button onclick="postMessage()">Post Message</button>
  <button onclick="showMessages()">Show Messages</button>
</div>

<div id="messagewall"></div>
Our HTML page is very simple. It contains two text input boxes, and two buttons. When you click the “Post Message” button, it calls the function postMessage(). When you click the “Show Messages” button, it calls the function showMessages().
Step 4: Let’s look at the script.js file for this project.
Let’s take a look at the script.js file next.
function writeMessage() {
  var msgObj = {};

  jQuery.post("/sendMsg", msgObj, function(data) {
    // What shall I do in here with the information
    // we get back from the server?
  });
}

function showMessages() {

}
We have two functions declared here: writeMessage(), and showMessages(). These correspond to our two buttons–when we click a button, one of these functions is called.
There’s a little bit of starter code in here, and we’re going to fill in the rest!
Step 5: Let’s look at the index.js file for this project.
Code you don’t need to touch
Finally, let’s take a look at our server side code in the index.js file. First, we have all of this code at the top of the file:
const express = require("express");
const bodyParser = require("body-parser");
const path = require("path");
const app = express();

app.use(bodyParser.json());
app.use(bodyParser.urlencoded({ extended: true }));
app.use(express.static(path.join(__dirname, "public")));

app.listen(8080, function() {
  console.log("Server started");
});
You don’t need to edit (or really worry too much about) any of this! I’ll go over it briefly, but again, this isn’t really the stuff you have to worry about. The first three lines tell the program which packages we’re including (express, body-parser, and path). Line 4 initializes the express program and stores it in the app variable.
Lines 6 and 7 are what allow us to pass information easily between the client and server as JSON data.
Line 8 lets us serve and access static files (like images, for instance) in the public directory (we won’t really be doing that in this program, but it’s often included as part of the standard Express boilerplate starter code).
Finally, lines 10-12 specify which port our server is listening for requests on, and starts up the server to listen for incoming requests.
Code you’ll be editing
var msgList = [];

app.post("/sendMsg", function(req, res) {
  // What are we going to do with
  // the request from the client?
});
This is where you’ll be editing and adding! There isn’t much here right now, but we’ll fix that later.
There’s a variable containing an empty array–this is where we’ll be storing the messages from our visitors.
There’s also an app.post method, which will be handling post requests to the /sendMsg route.
Posting a message
Now that we’ve taken a look around our existing files and code, let’s start making stuff happen! We’ll begin by sending a message (or, posting information) to the server from the client.
Step 6: Make the message object to send to the server.
Everything to do with sending this message to the server will be happening in the postMessage() function.
To begin with, the only information I’m going to send to the server is the message that the user writes in the “Your Message” box (we’ll add the user’s name later). I need to retrieve the value of whatever the user has written in the “Your Message” box, and then store it in an object.
function postMessage() {

  var userText = document.getElementById("message").value;
  var msgObj = { msg: userText };

  jQuery.post("/sendMsg", msgObj, function(data) {

  });
}
Remember, objects need to contain key-value pairs. In this case, the key is msg and the value is userText.
Also, after I’ve retrieved the value from the text box, I want to empty out the text box so my old message isn’t still in there after I’ve clicked the button.
function postMessage() {

  var userText = document.getElementById("message").value;
  var msgObj = { msg: userText };

  document.getElementById("message").value = "";

  jQuery.post("/sendMsg", msgObj, function(data) {

  });
}
Step 7: Send the message to the server.
We are going to send the data to the server using a jQuery POST request. The basic syntax of a jQuery POST request looks like this:
jQuery.post(route, data, callback);The route parameter specifies the route to which the request is sent.
The optional data parameter specifies some data to send along with the request (in this case, it will be msgObj).
The optional callback parameter is the function to be executed if the request succeeds (this can be the name of a function, or an anonymous function).
The code to post the message to the server has already been written for you:
jQuery.post("/sendMsg", msgObj, function(data) {
    // we'll come back to this
  });
We are sending our POST request to the /sendMsg route, and the data we are sending is msgObj. We’ll return to that callback function shortly!
Step 8: Capture the user’s message on the server.
Great! Now we’ve sent the user’s message from the client side. We have to make sure we’re set up to do something with that message on the server side.
Remember that we sent our request to the /sendMsg route. We need to make sure that there is a matching route handler on the server to receive that request.
app.post("/sendMsg", function(req, res) {
  // What are we going to do with
  // the request from the client?
});
Great, we already have a route definition set up for the /sendMsg path! We can see that this is a post request (app.post) that accepts requests sent to the /sendMsg path.
The data that we are receiving is stored in the req parameter. The response that we’ll send back will be done using the res parameter.
Let’s begin by seeing with is actually contained in the req parameter!
app.post("/sendMsg", function(req, res) {
console.log(req);
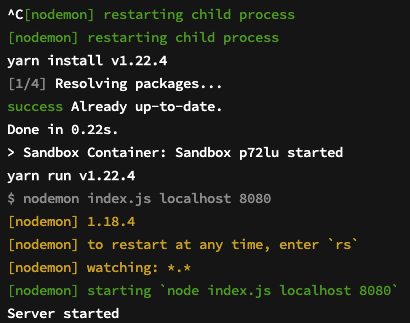
});Anytime that you make a change to the server code, you have to save your code and then restart the server in order for those changes to appear in your app!
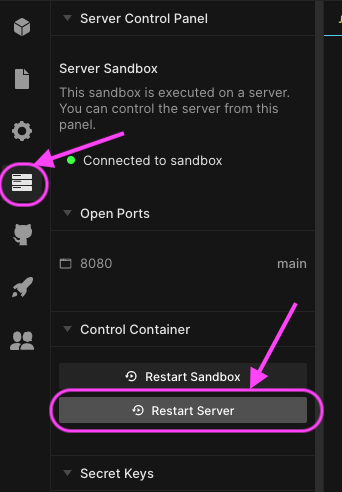
Note that whenever you restart the server, you’ll see some messages like this appear in your Terminal pane. This is just letting you know that the server has been restarted!
So what happens if I type “howdy” into the “Your Message” box and click “Post Message”?
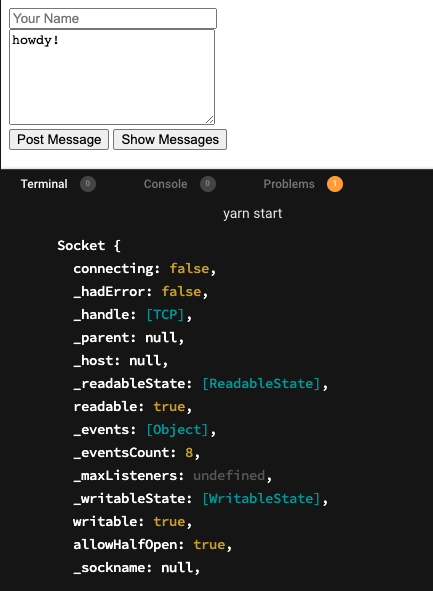
Whoa! I get a MASSIVE amount of stuff printed in the Terminal pane! That doesn’t look like what I want–this is AAAAALLL of the information associated with that POST request.
Let’s try printing req.body to the console instead–that will just give us the body of our POST request.
app.post("/sendMsg", function(req, res) {
  console.log(req.body);
});
Now what do I see if I type “Howdy!” into the “Your Message” box and click “Post Message”?

Hey, great! That looks like what I want. How about if I only want to see the string “Howdy!” and don’t want to print the entire object?
app.post("/sendMsg", function(req, res) {
  console.log(req.body.msg);
});
Terrific! Now I know how to access different values in an object on the server side!
Step 9: Store the user’s message on the server.
Now that I’ve successfully captured the data the user has sent over, I want to store that message. I want to store all of the messages I receive from various users, so that I can display all of the messages I’ve received from various users on the client side.
Well, we already have an empty array named msgList… seems like a good place to store the messages I’m getting!
app.post("/sendMsg", function(req, res) {
  console.log(req.body.msg);
  msgList.push(req.body)
});
I’m just going to store the entire object in my array.
Step 10: Send a “Success!” message back to the client.
It’s good practice to send some kind of “success!” message back to the client on a POST request. Remember, we have two parameters, req and res. We’ve already taken care of req–now, let’s use res to send a “Success! Hurray!” message back to the client.
app.post("/sendMsg", function(req, res) {
console.log(req.body.msg);
msgList.push(req.body);
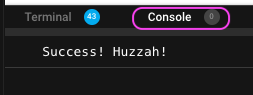
res.send("Success! Huzzah!");
});Step 10: Receive the “success!” message on the client side.
Back on the client side (in script.js), let’s just print our success message to the console so that we know we got an OK from the server.
The data parameter being passed into our callback function contains the response from the server: in this case, our “Success! Huzzah!” message.
jQuery.post("/sendMsg", msgObj, function(data) {
    console.log(data)
  });
Now when I type “Howdy!” into the “Your Message” box and click “Post Message”, I can see “Success! Huzzah!” appear in my Console pane.
Remember: the Terminal pane is the “console” for the server. The Console pane is the console for the client side!
Getting and displaying all stored messages
At this point, I’ve successfully sent and stored a message on the server side. Now I want to be able to retrieve and display all of the stored messages on the client side!
Step 11: Send a GET request to the server.
We haven’t done anything with that empty showMessages() function yet in the script.js file… now we will! This will be where our GET request goes.
function showMessages() {
  jQuery.get("/getMsgs", function(data) {
    // do something with the data
  });
}
You’ll notice this looks a lot like our jQuery.post() function from postMessage(), with a few differences. It’s a GET request, so it’s a jQuery.get() function. And since we’re getting information, rather than sending it, we’re not passing in an argument for an object to send to the server. The only parameters are the route (/getMsgs) and our anonymous callback function.
Step 12: Handle and respond to the GET request on the server.
Just as my POST request had a matching route on the server, my GET request needs to have a matching route on the server, too.
app.get("/getMsgs", function(req, res) {
  // what do we send to the client?
});
This looks really similar to my app.post() method–this one is handling a GET request (app.get) and it’s handling all GET requests sent to the /getMsgs route. There is a req and a res parameter: req contains information about the request, and res is what allows us to send back a response.
So, what do I want to send back to the client? My variable msgList is an array of objects, and contains all of the messages sent by all of the users. That’s what I want to send back to the client!
app.get("/getMsgs", function(req, res) {
  res.send(msgList)
});
Step 13: Display my list of messages on my HTML page.
We’re nearly there! We’ve sent a request to the server to give us all of the messages the server has received and stored. The server has sent that information to us. Now we have to take that information and display it on our HTML page.
Let’s start by taking a look at what we’ve actually received from the server, using console.log.
jQuery.get("/getMsgs", function(data) {
    console.log(data);
  });
I’m going to send a couple of messages: the first one will be “howdy!” and the second one will be “this is my second test message!”
What gets printed to the console when I click “Show Messages”?
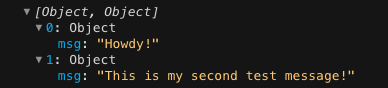
It’s an array with two objects in it, and each object contains one of the messages I sent. Exactly what we sent over from the server!
Now it’s simply a matter of looping through that array, and displaying each message in the div with an id of “messagewall”. I’m going to place each message in its own paragraph, for formatting purposes.
jQuery.get("/getMsgs", function(data) {
    console.log(data);
    var str = "";
    for (var d of data) {
      str += "<p>" + d.msg + "</p>";
    }
    document.getElementById("messagewall").innerHTML = str;
  });
What does the page look like now when I press the “Show Messages” button?
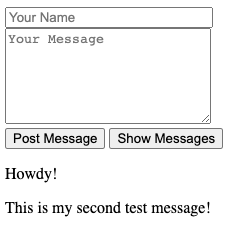
Perfect! My messages are displaying!
Adding user names
We now have a really, really basic message wall app that WORKS! Hurray! Right now, though, it only sends a message. I also want to have the user be able to send their name, and have that name associated with their message.
Fortunately, this is very quick and easy to add!
Step 14: Add the user’s name to msgObj.
Currently, in our postMessage() function in script.js, we have an object with only one property: msg.
I can easily add another property: name.
var userText = document.getElementById("message").value;
var userName = document.getElementById("name").value;
var msgObj = {
                msg: userText,
                name: userName
             };
Over on the server side in index.js, nothing changes! I’m still adding the entire req.body object to msgList–that object now just happens to contain a bit more information.
app.post("/sendMsg", function(req, res) {
  console.log(req.body.msg);
  msgList.push(req.body);
  res.send("Success! Huzzah!");
});
Back on the client side in script.js, I just need to add a few extra lines to showMessages() to display the user’s name along with their message.
function showMessages() {

  jQuery.get("/getMsgs", function(data) {
    console.log(data);
    var str = "";
    for (var d of data) {
      str += "<p><strong>" + d.name + "</strong></br>";
      str += d.msg + "</p>";
    }
    document.getElementById("messagewall").innerHTML = str;
  });
}
Now my message wall looks like this!

Polishing and extending
Now that you have a functioning message wall, let’s make it look GOOD. If you want to branch out and add in more features, there’s lots of room to do that, too!
Styling
- Add a header to the message wall, and give it a title (something like “Message Wall” or “Guestbook”).
- Add Google Fonts.
- Choose a color pallet, and style the various parts of your page with those colors (that includes the messages, the buttons, the input boxes–all of it!).
Challenges
- Think about additional information you could store and display on the message wall. Perhaps the user could provide their age range, or preferred pronouns.
- Could you implement a “liking” system, similar to something that Facebook or Instagram has, where users could “like” or “upvote” a message?
- Could users include a GIF with their message?